

Learning how to install plastic corrugated roofing can transform your greenhouse, garden shed, or outdoor structure while providing excellent durability and natural light transmission. This comprehensive DIY guide will walk you through the entire installation process, from selecting the right materials to completing your roof project with professional results.
What Is Corrugated Plastic Roofing?
Corrugated plastic roofing consists of lightweight panels featuring distinctive wave-like ridges called corrugations that provide 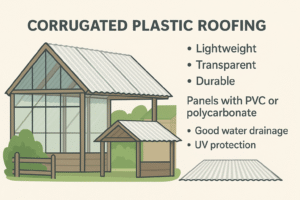 structural strength and efficient water drainage. These plastic sheets are manufactured from various materials, including PVC and polycarbonate, offering homeowners an affordable alternative to traditional metal roofing systems.
The corrugation pattern serves multiple purposes beyond aesthetics. It creates channels that direct rainwater away from the roof area while maintaining the panel’s rigidity across wide spans. This design makes plastic roof panels particularly suitable for structures requiring both weather protection and natural light penetration.
Benefits of Plastic Corrugated Roofing
Plastic corrugated roofing offers numerous advantages that make it an attractive choice for DIY enthusiasts and professional contractors alike. The panels are lightweight, making them easier to handle during installation compared to heavy materials like metal or clay tiles.
Key benefits include:
- Superior UV protection that prevents harmful rays while allowing natural light
- Excellent thermal expansion properties that accommodate temperature changes
- Resistance to corrosion and rust, unlike metal roofing alternatives
- Easy maintenance requirements with simple cleaning procedures
- Cost-effective solution for covering large roof areas
- Compatibility with various building codes and structural requirements
The ease of installation makes these materials particularly appealing for garden shed projects and greenhouse construction. Unlike complex roofing systems, corrugated sheets can be installed with basic tools and moderate skill levels.
Tools and Materials Needed to Install Corrugated Plastic Roofing
Before beginning your corrugated plastic roofing installation, gather all necessary tools and materials to ensure a smooth workflow. Having everything prepared prevents delays and ensures optimal results during the installation process.
Essential tools include:
- Circular saw with fine-tooth blade for cutting panels
- Power drill with appropriate bits for creating pre-drilled holes
- A measuring tape for accurate spacing and alignment
- Level to ensure proper slope and horizontal alignment
- Ladder for safe access to the roof area
- Safety equipment, including gloves and eye protection
Required materials:
- Corrugated plastic sheets in sufficient quantity for your roof area
- Wood screws or specialized fasteners with washers
- Closure strips for sealing gaps at the eaves
- Drip edge materials for proper water management
- Ridge cap components for finishing roof peaks
- Sealant for weatherproofing connections
Quality fasteners are crucial for securing the panels properly. Choose screws specifically designed for plastic roofing applications, typically featuring hex heads and neoprene washers that create weatherproof seals.
Types of Corrugated Plastic Roofing Panels
Understanding the different types of plastic available helps you select the most appropriate material for your specific application. Each type of corrugated roofing offers unique characteristics that affect durability, appearance, and performance.
Polycarbonate panels represent the premium option in plastic roofing materials. These panels provide exceptional impact resistance and can withstand heavy snow loads better than other plastic alternatives. They maintain clarity over time and offer superior UV protection for underlying structures.
Fiberglass corrugated sheets offer excellent strength-to-weight ratios and natural translucency. These panels work particularly well for greenhouse applications where maximum light transmission is desired while maintaining structural integrity.
PVC Corrugated Roofing Sheets
When learning how to install PVC corrugated roofing sheets, it’s important to understand that these panels provide an economical solution for many roofing applications. These panels offer good durability and weather resistance while remaining budget-friendly for large projects. PVC sheets are particularly popular for garden shed installations and temporary structures.
The material’s flexibility allows it to accommodate slight structural movements without cracking. However, PVC may become more brittle in extremely cold conditions, making it less suitable for regions experiencing severe winter weather.
Installation of PVC sheets follows the same basic principles as other corrugated materials, though special attention should be paid to thermal expansion considerations during fastening.
Polycarbonate vs. PVC: What’s Best for You?
Choosing between polycarbonate and PVC depends on your specific requirements, budget, and local climate conditions. Polycarbonate panels typically cost more initially but 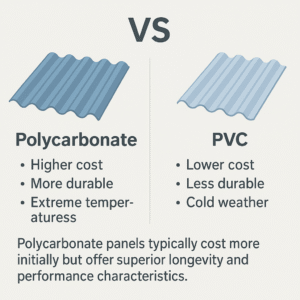 offer superior longevity and performance characteristics.
Polycarbonate advantages:
- Superior impact resistance against hail and debris
- Better UV stability with longer warranty periods
- Maintains structural integrity in extreme temperatures
- Excellent light transmission with reduced yellowing over time
PVC advantages:
- Lower initial cost for budget-conscious projects
- Adequate performance for most residential applications
- Easier to cut and modify during installation
- Sufficient durability for structures with moderate exposure
Consider your local climate when making this decision. Areas with frequent severe weather or extreme temperature variations benefit from polycarbonate’s superior performance characteristics.
Planning and Preparation for Installing Corrugated Plastic Roofing
Proper planning ensures your corrugated plastic roofing installation proceeds smoothly and meets all structural requirements. Begin by carefully measuring your roof area and calculating the number of panels needed, including a 10% allowance for waste and future repairs.
Understanding framing for corrugated plastic roofing is crucial during the planning phase. Check local building codes to determine minimum slope requirements for your area. Most jurisdictions require a minimum slope of 1/4 inch per foot for proper drainage, though steeper slopes provide better water management and reduce the risk of leaks.
Examine the existing roof frame structure to ensure it can support the new roofing system. While plastic panels are lightweight, proper roof trusses and rafter spacing remain essential for long-term performance. Standard framing for corrugated plastic roofing typically requires purlins every 24 inches on center to provide adequate support and prevent panel sagging.
Weather considerations:
- Avoid installation during high winds or precipitation
- Choose calm, dry days for optimal working conditions
- Allow materials to acclimate to ambient temperature before installation
- Plan for thermal expansion gaps in hot climates
Obtain necessary permits before beginning work. Many areas require permits for roofing projects, even on accessory structures like sheds and greenhouses.
How to Install Corrugated Plastic Roofing
The actual installation process requires careful attention to detail and proper sequencing of steps. Following the manufacturer’s detailed instructions ensures optimal performance and longevity of your corrugated roofing system.
Begin installation at the lower edge of the roof, working systematically toward the ridge. 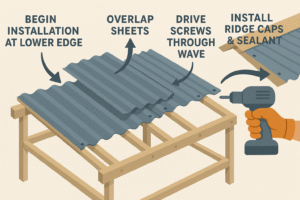 This approach ensures proper water shedding and allows each subsequent panel to overlap the previous one correctly.
Step 1: Ensure Your Roof Frame Is Square
Before installing any panels, verify that your roof frame maintains square geometry and proper dimensions. Use diagonal measurements to check for square corners, adjusting the frame as necessary before proceeding.
A square frame ensures that corrugated sheets align properly and prevents gaps that could compromise weather protection. Take time to make any necessary adjustments at this stage, as corrections become much more difficult once panels are installed.
Check that all rafters are level and properly spaced. Uneven framing can cause panels to buckle or create stress points that may lead to premature failure.
<H3> Step 2: Install Purlins and Blocking
Install purlins perpendicular to the rafters to provide proper support for the corrugated panels. Space purlins according to the manufacturer’s recommendations, typically 24 inches on center for most applications.
Use blocking between rafters at the eaves and gable ends to provide solid attachment points for closure strips and trim pieces. This blocking prevents wind uplift and ensures secure attachment of all roofing components.
Verify that all purlins are level and properly aligned before proceeding to panel installation. Any irregularities in the support structure will telegraph through to the finished roof surface.
Step 3: Install Drip Edge and Closure Strips
Install drip edge components along the eaves to direct water away from the structure and prevent water infiltration under the roofing panels. Proper drip edge installation is crucial for long-term weather protection.
Attach closure strips along the eaves to seal the gaps between the corrugated panel profiles and the roof structure. These strips prevent wind-driven rain from entering the building while allowing proper ventilation.
Use appropriate fasteners to secure these components, ensuring they remain firmly attached during severe weather conditions. Pre-drill holes to prevent cracking of closure strip materials.
Step 4: Align and Attach the First Roofing Sheet
Position the first corrugated sheet carefully, ensuring proper alignment with the roof edges and maintaining the specified overhang at the eaves. The first panel establishes the alignment pattern for the entire roof area.
Mark fastener locations before drilling, spacing screws according to the manufacturer’s specifications. Typical spacing requires fasteners every 6 to 8 inches along the edges and every 2 feet horizontally across the panel width.
Pre-drill holes to prevent cracking of the plastic material during screw insertion. Use a drill bit slightly smaller than the screw diameter to ensure proper thread engagement without over-sizing the holes.
Step 5: Overlap and Install the Remaining Panels
Install subsequent panels with proper overlap to ensure weather protection. Most corrugated panels require a minimum overlap of one and one-half corrugations at the sides and 6 inches at the ends.
Maintain consistent spacing and alignment as you progress across the roof. Check alignment frequently to prevent accumulated errors that could affect the final panels’ fit.
Secure each panel with the appropriate number of fasteners, ensuring screws penetrate through the crown of the corrugations rather than the valleys. This placement provides better holding power and reduces the risk of water infiltration.
Step 6: How to Attach Corrugated Plastic Roofing Properly
Proper fastening technique is critical for the long-term performance of your corrugated roofing system. Drive screws firmly but avoid over-tightening, which can crack the plastic or compress the washer excessively.
The washer should compress slightly to create a weather seal without distorting the panel profile. Over-tightened fasteners may cause stress cracking or allow thermal expansion movement to damage the attachment points.
Space fasteners according to manufacturer recommendations, typically requiring more fasteners near roof edges and areas subject to higher wind loads. Follow local building codes for specific fastening requirements in your area.
Step 7: Install the Ridge Cap and Seal the Edges
Complete the installation by attaching ridge cap components along the roof peak. These caps shed water while providing ventilation for the enclosed space below.
Install gable trim along the roof’s edges to provide a finished appearance and additional weather protection. Proper trim installation prevents wind-driven rain from infiltrating the roofing system.
Apply sealant at critical joints and penetrations to ensure complete weather protection. Use sealants specifically designed for plastic roofing applications to ensure compatibility and longevity.
Corrugated Plastic Roofing Installation Tips
Success with plastic roofing installation depends on attention to detail and following proven techniques. Allow for thermal expansion by avoiding over-tightening fasteners, especially in climates with significant temperature variations.
Cut panels with a fine-tooth circular saw blade to minimize chipping and provide clean edges. Support panels adequately during cutting to prevent vibration and ensure accurate cuts.
Professional installation tips:
- Work during moderate temperatures for easier handling
- Keep panels shaded until installation to prevent excessive heating
- Use proper safety equipment, including non-slip shoes
- Plan material staging to minimize panel movement
- Check weather forecasts and avoid installation during storms
Store unused panels properly to prevent damage from UV exposure or physical impact. Cover materials when not in use and avoid stacking excessive weight on stored panels.
Post-Installation Checklist and Maintenance Guide
After completing your corrugated plastic roofing installation, conduct a thorough inspection to ensure all components are properly secured and aligned. Check that all fasteners are properly tightened and washers are creating effective seals.
Verify that water drainage is functioning correctly by observing performance during the first rainfall. Look for any areas where water might pond or flow improperly, addressing issues immediately to prevent long-term problems.
Regular maintenance requirements:
- Clean panels annually to remove debris and maintain appearance
- Inspect fasteners for loosening or corrosion
- Check sealants and replace as needed
- Remove accumulated snow loads in heavy snow regions
- Trim vegetation that might contact or shade the panels
Establish a maintenance schedule to ensure the continued performance of your roofing system. Regular attention prevents small issues from developing into major problems requiring extensive repairs.
Why Choose Roofing San Jose for Your Plastic Roofing Installation
While DIY installation is certainly possible for many homeowners, professional installation ensures optimal results and may be required for complex structures or commercial applications.
Professional contractors bring experience with local building codes and weather conditions that affect installation techniques and material selection. They also provide warranties on both materials and workmanship.
Local Expertise in Corrugated Plastic Roofing Installation
Experienced roofing contractors understand the specific challenges posed by local climate conditions and building requirements. They can recommend the most appropriate materials and installation techniques for your specific situation.
Professional installation often proceeds more quickly than DIY projects, minimizing weather exposure during construction and reducing disruption to your daily activities.
Benefits of Hiring a San Jose Roofing Contractor
Professional contractors carry appropriate insurance and licensing, protecting homeowners from liability during the installation process. They also have access to professional-grade materials and tools that may not be available to DIY installers.
Many contractors offer extended warranties on their work, providing peace of mind and protection against installation-related issues that might develop over time.
Final Thoughts: Is Corrugated Plastic Roofing Right for You?
Corrugated plastic roofing offers an excellent balance of performance, durability, and affordability for many applications. The lightweight nature and ease of installation make it particularly attractive for DIY projects and structures requiring natural light transmission.
Consider your specific needs, local climate conditions, and budget when deciding whether plastic corrugated roofing is appropriate for your project. For structures like greenhouses and garden sheds, these materials often provide the ideal combination of features.
The installation process, while requiring careful attention to detail, remains within the capabilities of most DIY enthusiasts with basic construction skills and proper tools.