
EPDM roofing installation has become the preferred choice for flat and low-slope roof applications across residential and commercial buildings. This synthetic rubber membrane offers exceptional durability, weather resistance, and cost-effectiveness for roofing projects. Understanding how to install EPDM roofing properly ensures maximum performance and extends the roof’s life significantly.
What Is EPDM Roofing?
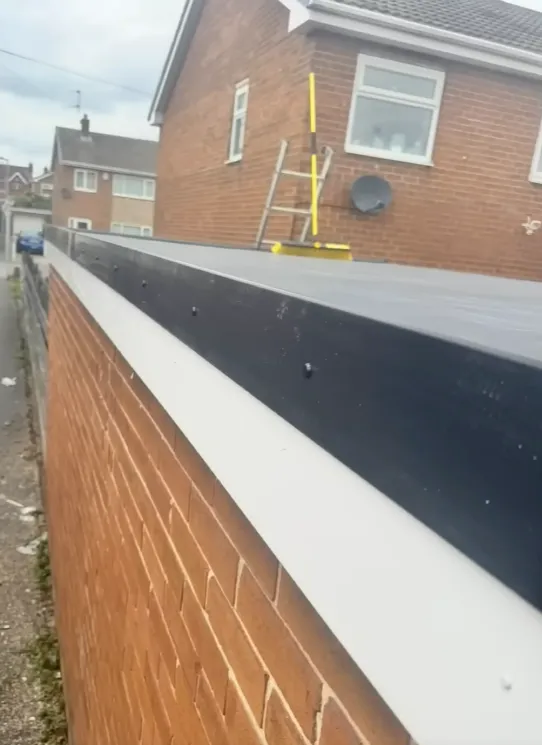
EPDM (ethylene propylene diene monomer) represents a synthetic rubber membrane specifically designed for low-slope roofing applications. This single-ply roofing material consists of ethylene propylene diene compounds that create a highly durable and flexible roofing solution. The rubber roofing membrane typically comes in black or white variations, with thickness ranging from 45 mil to 90 mil, depending on the specific application requirements.
The EPDM membrane demonstrates exceptional resistance to UV radiation, ozone, and extreme weather conditions. Manufacturers of EPDM produce these roof materials with advanced formulations that maintain flexibility even in harsh climates. This makes EPDM roofing systems particularly suitable for commercial roofing applications where long-lasting performance is essential.
Benefits of EPDM Roofing Systems
Installing EPDM roofing provides numerous advantages for property owners considering roof replacement or new construction projects. The material offers outstanding puncture resistance and can withstand hail damage better than many alternative roofing products. EPDM’s flexibility prevents cracking during thermal expansion and contraction cycles.
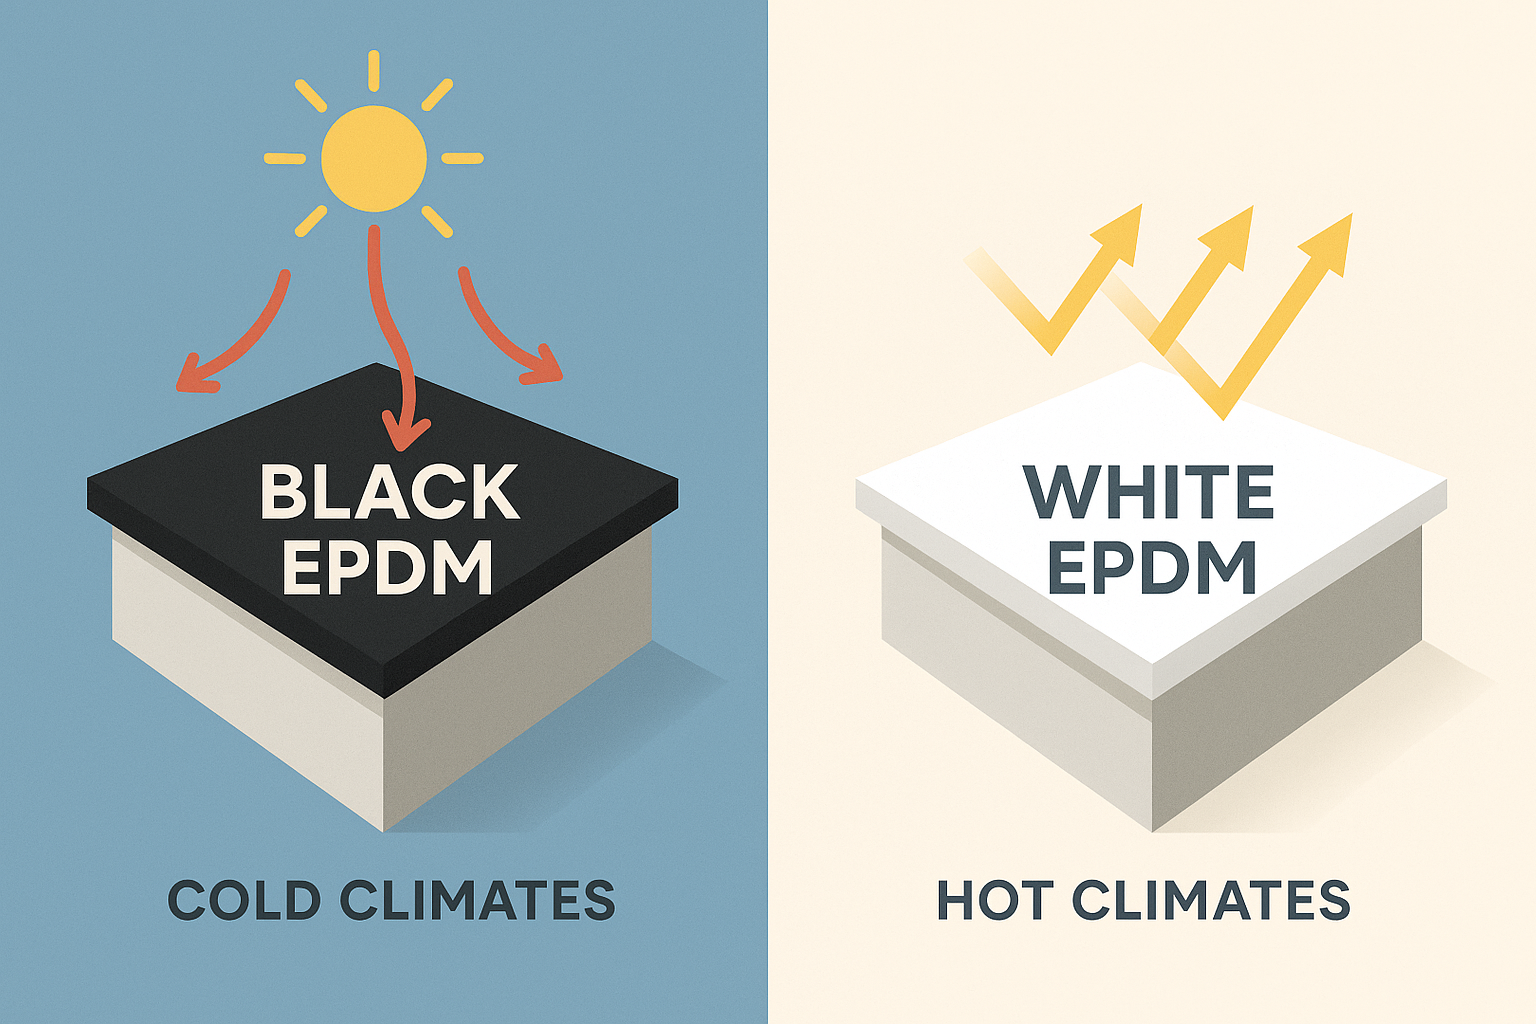
The lifespan of properly installed EPDM roofing systems typically ranges from 20 to 30 years with minimal maintenance requirements. White EPDM membranes provide enhanced reflectivity, reducing cooling costs during hot weather. Black EPDM membranes absorb heat effectively, which can benefit buildings in colder climates by reducing heating expenses.
Types of EPDM Roofing Installation Methods
Roofing contractors utilize three primary methods for installing EPDM rubber roofing systems. Each installation approach offers specific benefits depending on building requirements, local climate conditions, and budget considerations.
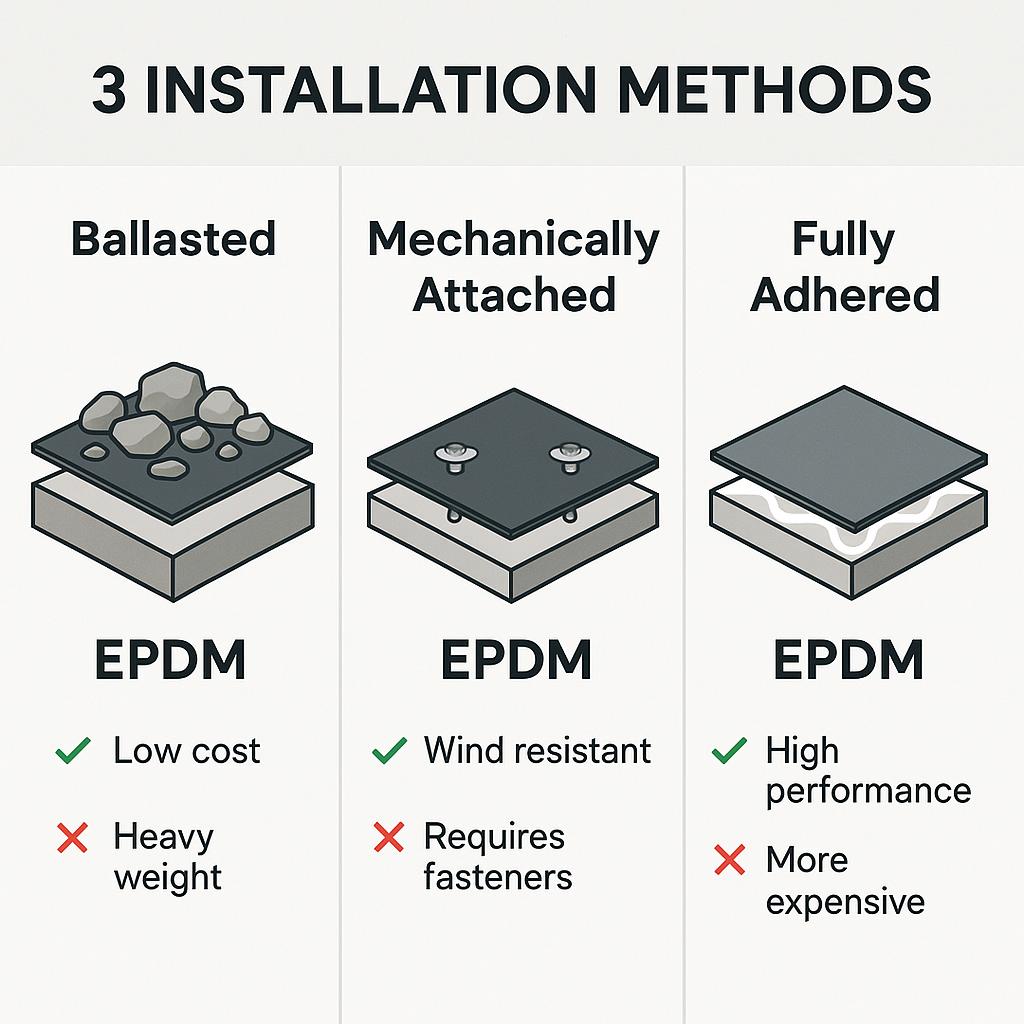
1. Ballasted EPDM Roofing System
The ballasted system installation method involves laying the EPDM membrane loosely over the roof deck and securing it with ballast materials. Concrete pavers, gravel, or specialized paver systems provide the necessary weight to keep the membrane in place. This approach works particularly well for flat roofs with adequate structural support.
Ballasted systems offer easy installation and simplified maintenance procedures. However, the additional weight requires careful evaluation of the roof deck’s load-bearing capacity. This method also facilitates easier roof repairs when necessary.
2. Mechanically Attached EPDM System
Mechanically attached installations use specialized fasteners to secure the rubber roofing membrane directly to the roof deck. This method provides excellent wind resistance and works well on roofs where ballast systems aren’t feasible due to weight restrictions.
The fastener placement follows specific patterns recommended by EPDM manufacturers to ensure proper load distribution. Insulation boards often get installed beneath the membrane to improve energy efficiency and provide additional protection against punctures.
3. Fully Adhered EPDM Rubber Roofing
Fully adhered systems utilize roofing adhesives to bond the EPDM membrane completely to the substrate. This installation method creates the most secure attachment and works exceptionally well in high-wind areas. The adhesive application requires careful attention to weather conditions and proper surface preparation.
This approach offers superior performance in extreme weather but requires more technical expertise during installation. The quality of installation directly impacts the system’s long-term performance and warranty coverage.
4. White vs. Black EPDM Roofing Membranes
Choosing between white and black EPDM membranes depends on climate considerations and energy efficiency goals. White EPDM provides highly reflective properties that reduce solar heat gain and lower cooling costs in warm climates. The reflective surface helps maintain comfortable indoor temperatures while reducing energy consumption.
Black membrane options cost less initially and work well in colder regions where heat absorption benefits the building. Three EPDM color variations may be available from some manufacturers, though black and white remain the most common choices for commercial and residential applications.
How to Install EPDM Roofing: Step-by-Step

Installing rubber roofing requires careful planning, proper tools, and attention to detail throughout the process. Professional roofing companies typically complete EPDM roofing system installation in several distinct phases.
Preparation: Tools, Surface Cleaning, and Safety
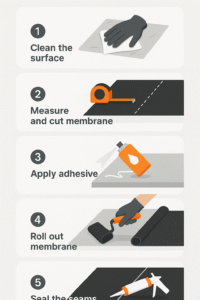
Proper preparation ensures successful EPDM installation and long-term performance. The roof deck must be clean, dry, and structurally sound before beginning membrane installation. Remove all debris, old roofing materials, and inspect for any damage requiring repair.
Essential tools include utility knives, rollers, brushes for adhesive application, and measuring equipment. Safety equipment such as harnesses, non-slip footwear, and appropriate clothing protects workers during the installation process. Weather conditions must be suitable – avoid installing during rain, snow, or high winds.
Installing the EPDM Rubber Membrane
Begin membrane installation by carefully measuring and cutting the EPDM material to fit the roof dimensions. Allow for proper overlap at seams and adequate material for vertical surfaces. Handle the membrane carefully to prevent tears or punctures during positioning.
Unroll the membrane systematically, working from one end to the other while maintaining proper alignment. Avoid stretching the material excessively, as this can create stress points that may fail over time. The EPDM should lay flat without wrinkles or bubbles.
Applying Adhesive and Rolling Out the Sheet
When using fully adhered installation methods, apply roofing adhesive evenly across the designated areas following the manufacturer’s specifications. Work in manageable sections to prevent the adhesive from setting before membrane placement.
Roll out the EPDM sheet gradually, pressing firmly to ensure complete contact with the adhesive. Use appropriate rollers to eliminate air bubbles and create strong adhesion between the membrane and substrate. Pay special attention to edges and corners where proper bonding is critical.
Sealing Seams and Roof Edges
Seam sealing represents one of the most critical aspects of EPDM roofing installation. Clean both membrane surfaces thoroughly before applying seam adhesive or tape. Follow manufacturer guidelines for overlap dimensions and curing times.
Roof edges require careful attention to prevent water infiltration and wind uplift. Secure the membrane to vertical surfaces using appropriate termination methods such as termination bars or adhesive applications. Ensure all penetrations receive proper sealing treatment.
Final Inspection and Post-Installation Tips
Conduct a thorough inspection of the completed installation, checking for proper seam sealing, adequate membrane attachment, and correct treatment of all roof penetrations. Address any deficiencies immediately while materials and equipment remain on-site.
Document the installation process and maintain records for warranty purposes. Schedule regular maintenance inspections to identify potential issues before they become major problems. Proper maintenance significantly extends the EPDM roof’s service life.
EPDM Rubber Roofing Installation Tips & Best Practices
Successful EPDM installation requires attention to environmental conditions and proper application. Installing EPDM roofing works best when temperatures remain between 45°F and 85°F. Extreme temperatures can affect adhesive performance and membrane handling characteristics.
Avoid walking on freshly installed membranes until adhesives cure completely. Use walk pads or protective materials when access is necessary during the installation process. Store EPDM materials properly before installation to prevent damage from UV exposure or contamination.
How Much Does an EPDM Roof Installation Cost?
EPDM roof costs vary significantly based on installation method, membrane thickness, and project complexity. Material costs typically range from $3 to $7 per square foot, while labor costs add another $2 to $5 per square foot, depending on local market conditions.
Ballasted systems generally cost less initially but require structural evaluation for load capacity. Fully adhered systems cost more upfront but offer superior performance in challenging weather conditions. Consider long-term maintenance costs and energy savings when evaluating total project investment.
EPDM Roofing Maintenance and Repairs
Regular maintenance preserves EPDM roofing system performance and maximizes lifespan. Inspect the roof twice annually, checking for ponding water, damaged seams, or membrane punctures. Remove debris promptly to prevent drainage issues and potential damage.
Repairing an EPDM roof typically involves cleaning the damaged area and applying appropriate patches or sealants. Small punctures can often be repaired using EPDM patch kits, while larger damage may require professional assessment and repair.
Why Choose Roofing San Jose for Rubber Roofing Installation?
Expertise in EPDM Roofing System Installation
Professional roofing contractors bring essential experience and technical knowledge to EPDM installation projects. Proper installation techniques ensure warranty compliance and optimal system performance throughout the roof’s service life.
Licensed and Insured Local Roofing Contractors
Working with licensed and insured roofing experts protects property owners from liability and ensures quality workmanship. Local contractors understand regional climate challenges and building code requirements that affect EPDM installation success.
Final Thoughts: Is EPDM Roofing Right for Your Project?
EPDM roofing provides an excellent solution for flat or low-slope roof applications when installed correctly. The material’s durability, cost-effectiveness, and ease of maintenance make it attractive for both commercial and residential projects. Consider your specific climate conditions, building requirements, and budget when evaluating roofing solutions.