
Learning how to cut metal roofing properly is essential for any successful roofing project. Whether you’re working with steel panels, tin roofing, or other metal sheets, using the right tool and method ensures clean edges, prevents damage, and maintains the integrity of your metal roof installation. This comprehensive guide covers everything you need to know about cutting metal roofing panels to length with professional results.
Why Cutting Metal Roofing Correctly Matters
When working with metal panels for roofing projects, using the right method and tool can mean the difference between a clean install and a costly mistake. Whether you’re trimming a steel sheet or making a straight cut through corrugated tin, accurate cuts ensure a better fit, reduce visible gaps, and protect the roof from weather damage. Sharp, clean edges also make your installation safer and more professional-looking.
Improper techniques can lead to jagged fragments, rough edges, or damage to the metal sheet profile. That’s why it’s essential to learn how to cut metal roofing correctly before starting your project.
Tools and Materials You’ll Need
Cutting metal roofing accurately is crucial for several reasons. When you cut metal roofing panels incorrectly, you risk creating rough edges that can cause injury during installation. Imprecise cuts lead to visible gaps, poor weatherproofing, and potential water infiltration. Professional roofers understand that the cutting process directly affects the longevity and performance of the entire roofing system.
Working with metal requires attention to detail and the use of appropriate tools. A mistake during the cutting process can result in wasted materials, increased project costs, and compromised structural integrity. Clean edges and precise measurements ensure that each metal panel fits perfectly, creating a seamless and durable roof surface.
Essential Tools for Cutting Metal Roofing
The best way to cut metal roofing depends on the thickness and type of material you’re working with. For most residential projects, you’ll need one or more of these cutting tools:
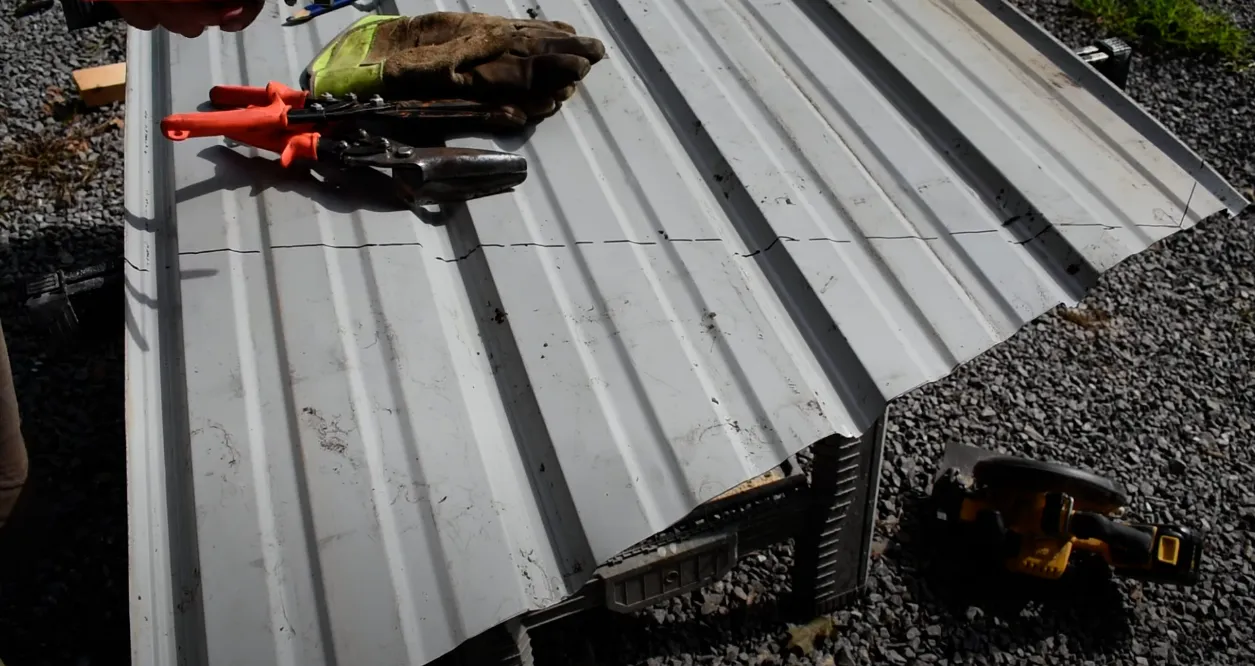
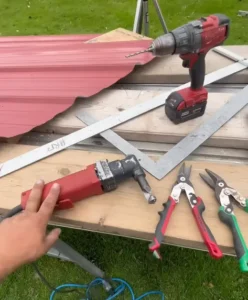
Tin Snips and Aviation Snips: These hand tools work best for thinner metal sheets and straight cuts. Aviation snips come in three types – left-cutting, right-cutting, and straight-cutting varieties. They provide excellent control for detailed work and curves.
Electric Metal Shears: Power tools like electric shears make quick work of cutting metal panels, especially when you need to cut multiple sheets to length. These tools create clean edges with minimal effort and are ideal for larger projects.
Angle Grinder: For thicker metal or when you need to make rough cuts quickly, an angle grinder with a metal cutting blade provides versatility. However, this tool requires careful handling and produces more debris than other options.
Nibblers: A nibbler tool removes small pieces of metal in a controlled manner, making it perfect for curved cuts and intricate shapes. This tool minimizes burr formation and creates smooth edges.
Circular Saw with Metal Blade: For long, straight cuts on metal roofing, a circular saw equipped with a specialized metal cutting blade offers speed and precision.
Recommended Safety Gear
Safety should be your top priority when cutting the metal. Essential protective equipment includes:
- Safety goggles to protect your eyes from metal fragments and debris
- Work gloves with a good grip to handle sharp metal edges safely
- A dust mask to prevent inhalation of metal particles
- Earplugs are necessary when using power tools like angle grinders
- Long sleeves to protect your arms from sharp edges and hot metal fragments
Step-by-Step Guide: How to Cut Metal Roofing Panels
Step 1: Measure and Mark the Cutting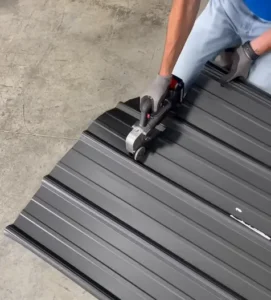 Line
Line
Begin by taking accurate measurements of the area where each metal panel will be installed. Use a tape measure to determine the exact length needed, then mark the cutting line clearly with a marker. Double-check your measurements to avoid costly mistakes – remember, you can’t add material back once it’s cut.
Step 2: Place Panels on a Flat, Stable Surface
Position your metal sheet on a stable work surface that can support the entire panel. A flat surface prevents the metal from bending during the cutting process and ensures straight cuts. If working outdoors, make sure your workspace is level and free from debris that could interfere with your cutting line.
Step 3: Secure the Roofing Sheets
Clamp or secure the metal roofing panel to prevent movement during cutting. This step is particularly important when using power tools, as any shifting can result in uneven cuts or accidents. Make sure the area you plan to cut extends slightly beyond the edge of your work surface.
Step 4: Select the Right Tool for the Job
Choose your cutting tool based on the metal thickness and type of cut required. For thin sheets and straight cuts, tin snips work excellently. For thicker metal or longer cuts, consider using electric shears or an angle grinder. The profile and corrugated design of some metal roofing may require specific tools for best results.
Step 5: Cut with Control and Precision
When cutting metal roofing by hand, maintain steady pressure and follow your marked line carefully. If using power tools, let the tool do the work – don’t force it through the material. For cuts straight across the width of corrugated panels, follow the valley between ribs when possible to maintain the panel’s structural integrity.
Step 6: Smooth Sharp Edges for Safety
After cutting, inspect the edges for burrs or sharp projections. Use a file or sandpaper to smooth any rough edges, which prevents injury during installation and creates a more professional appearance. This step is especially important for visible edges and areas where panels overlap.
Step 7: Clean Up Your Work Area
Remove all metal debris and fragments from your workspace. These sharp pieces can cause punctures or injuries if left scattered around the project area. Proper cleanup also prevents damage to other materials and tools.
Best Way to Cut Metal Roofing for Specific Scenarios
Cutting Tin Roofing: The best way to cut tin roofing involves using sharp tin snips for most applications. Tin is typically thinner than steel, making it easier to cut by hand while maintaining control and precision.
Professional Metal Cutting: How do professionals cut metal roofing? They often use specialized tools like electric metal shears or nibblers for efficiency and consistent results. Professional roofers also pre-cut panels when possible to minimize on-site cutting.
Cutting Steel Roofing: Steel panels require more robust tools due to their thickness. An angle grinder or electric shears typically provide the best results when learning how to cut steel roofing effectively.
Curved Cuts: For trim work or custom fits around obstacles, a nibbler or aviation snips allow for precise curved cuts without damaging the surrounding material.
Pros and Cons of Different Cutting Tools
Tool | Pros | Cons |
Tin Snips | Affordable, easy to use, no power needed | Slower, not ideal for long straight cuts |
Metal Shears | Fast, clean cuts | Expensive, bulky |
Angle Grinder | Cuts through thick material fast | Noisy, lots of sparks and rough edges |
Circular Saw | Ideal for straight panels | Can be messy, needs blade change |
Nibbler | Great for curves and profiles | Requires drill, slower on long cuts |
Each tool is ideal for different situations. Always use the right tool based on panel type, desired cut, and your skill level.

Safety Precautions When Cutting Metal Roofing
Working with metal roofing requires constant attention to safety. Always wear appropriate protective equipment, including goggles, gloves, and long sleeves. Metal fragments can fly considerable distances, especially when using power tools, so clear the area of bystanders.
Be aware that cutting metal generates heat, which can cause burns or even ignite nearby flammable materials. Keep a fire extinguisher nearby when using angle grinders, and allow cut pieces to cool before handling.
Maintain your tools properly – dull blades require more force and are more likely to slip or bind. Sharp tools cut easier and safer than dull ones. Inspect your workspace regularly for metal shavings and debris that could cause slips or puncture wounds.
Never rush the cutting process. Take your time to ensure accurate measurements and clean cuts. A mistake during cutting often means starting over with new material, increasing both cost and project time.
<H2> Why Choose Roofing San Jose for Your Metal Roofing Needs?
If you’re located in the Bay Area, Roofing San Jose offers high-quality roofing services with a professional approach to metal roof installation. Here’s why homeowners and contractors trust them:
- Local expertise – Deep knowledge of weather conditions and code requirements
- Skilled roofers – Professional installation and precise panel cuts
- High-grade tools – Every project uses advanced, durable cutting equipment
- Free estimates – Transparent pricing with no hidden fees
- Customer-first support – Fast turnaround and ongoing service guarantees
Choosing Roofing San Jose ensures your roofing project is completed accurately, safely, and on time.
Final Thoughts on Cutting Metal Roofing Safely and Effectively
Cutting metal panels doesn’t have to be intimidating. Whether you’re making a few trim cuts or an entire roof installation, the key is preparation. Understand the material, choose the right tool, and follow each step with care. From aviation snips for curves to circular saws for straight lines, each method has its place. Prioritize clean edges, proper measurements, and always follow safety protocols.